-
-
Published
Linked with GitHub
# Ethereum on PS4
I am currently [syncing an Eth node](https://twitter.com/TMIYChao/status/1720182814119735340) on an old PlayStation 4 machine and since it was quite a journey, I am here to share details in the hope someone might replicate this effort one day.
Everything started with a casual discussion about gaming with my peers. I am not much of a gamer, and recently I've only been playing some indie games from [itch](https://itch.io/) on my GNU/Linux laptop. There are some interesting big-name titles I'd like to try, but I lack the hardware to run them, and generally, I just don't like that games require a proprietary/DRM environment.
Consoles seem like the cheapest option optimized for games but growing up I never owned one and I still cannot imagine owning hardware locked by the manufacturer for a single purpose. On the other hand, I know people have been hacking them for years, legends like geohot! Researching this, I fell down the PlayStation jailbreaking rabbit hole, and boy, it's quite huge.
## Hacking PS4
Older PS4 firmwares include vulnerabilities allowing us to take over the control. This enables you to tweak many things, pirate games and even run your own kernel on the machine! Clearly, this is the best and most fun thing to do with your PS(if you are into voiding warranties and bending rules :)). The only thing you need is a PS4 with old enough software and if you own one, the best advice is to **NEVER UPDATE YOUR PLAYSTATION**. An older or exploited firmware will block you from playing games online, using the PS Store, etc but I am not interested in that anyway, I want to run my Ethereum node. So here is what it takes:
- Getting a machine with the correct firmware (hardest part)
- Updating/upgrading
- Jailbreaking
- Loading gnu/linux
- Running Ethereum
Again, there is a big community with many guides, forums and tutorials on all of this and I recommend you doing your own reserach. But as it was quite a journey putting every piece together, here is my story.
### Obtaining a PS4
The first part is the hardest because we have to find a suitable, hackable console. Specifically, we are looking for a machine with firmware **9.00 or older**. Anything later than that is quite useless.
> Update May 2024: An exploit for firmware 11.00 (and lower) was released. It is possible to jailbrake the console at this firmware, however the process is different than described below and might be unstable especially for running Linux.
The firmware version 9.00 is from 2021, more than 2.5 years old at the time of writing, and since PS consoles constantly update when used, it might be quite tough to find one with the right version. If you have a console on hand, you can easily check it in `Settings - System - System information`. If it's anything above 9.00, sadly, you might have to wait a pretty long time until there is a jailbreak for that version or if you are security researcher, maybe you might be interested in diving into it yourself.
But isn't it possible to just downgrade? TLDR, no. PS doesn't allow installing older firmware and the only way to bypass this is when you updated and the older firmware is still loaded in the backup chip. In this case, [you could downgrade](https://wololo.net/2022/12/06/it-is-apparently-possible-to-revert-your-ps4-to-its-previous-firmware-version-without-any-backup/) but you have to take the machine apart and do a little fix using a soldering iron and sysglitch to force the machine to boot the older firmware version. This is quite a hustle and it's much more practical to find a console with an old enough system.
Even though there are many people selling their old consoles, this turned out to be quite a challange. You can search for PS4 on your local bazaar site, Ebay, Facebook marketplace or something similar and find tons of them but the vast majority of offers don't mention its firmware version (well, because normal people don't care). The first few days I wrote the same message to every PS4 seller I found on every local marketplace asking about the firmware version. Some responded willing to check it for me and I found a great deal after a day or two. But after the guy confirmed the system version, he left it on and it automatically updated 😢

I ended up buying my machine from a pawn shop/second hand electronics store that advertises their old PS4 machines even with supposed firmware versions in description. They were nice enough to plug it in for me so I could check whether it works. I quickly went to settings and confirmed the version is old enough (newer than the description said but still good enough).
When searching for a console, you might ask which hardware revision to pick because there are three: fat (original), Slim and Pro. The software and jailbreak is the same on all of them and since machines with the correct versions are limited, I wouldn't be that picky. Ideally, aim for Slim because it's more portable or Pro because it offers extra performance.
Prices vary between 100-200$ which is much cheaper than a server or MiniPC while offering decent performance. If you stumble upon someone who knows why you are looking for a specific firmware, the price might be higher but most people don't care and consider it obsolete hardware. All together it took me more than a week of quite intense search to find a correct piece.
### Preparing the console
With a console running the right version, let's put on some hacker gloves and get into the fun part. First, we want to upgrade it and potentially update the software ourselves.
But keep in mind not to connect it to the internet! It might start updating by itself and we want to avoid that. Go to Settings and disable automatic updates. First let's talk about upgrading.
The PS4 still comes with an HDD drive, which is pretty slow even for gaming, let alone Eth node. Also, if you wish to run the mainnet, you need more space anyway. Buy a 2.5" SSD and replace it, it requires some dissemblance but is easily doable. Don't waste money on a high-end SSD because the console is using SATA 2 which limits the speed. The Pro version has SATA 3 enabling higher speeds so if you have that, check for suitable SSDs.
Even if you keep the HDD (the machine works just as well), the last step will be the same - installing firmware. You should update to 9.00 firmware if you have older since it's the latest one possible to exploit and also considered stable, widely supported. Keep the machine offline and do this [manually using a USB drive](https://wololo.net/2021/12/14/ps4-how-to-manually-update-to-firmware-9-00/).
Again, we need to stop PS4 from updating and after you disabled updates, it can still do whatever it wants as long as it's connected to the internet. When setting up the internet connection, choose custom setup and change [DNS to a community provided](https://github.com/Al-Azif/ps4-exploit-host#using-remote-dns-run-nothing-locally) server which blocks Sony updates.
### Jailbreak itself
We are going to use an exploit to gain control and free this poor machine from its proprietary chains.
Thanks to tireless efforts from PS jailbreak community, the process is actually very simple. It requires visiting a website (an exploit host) from PS4 which loads the attack and plugging in a USB drive.
There are many different exploit host providers and their content mostly overlaps. You can [host this website by yourself](https://github.com/Al-Azif/ps4-exploit-host) over a local network or even [publically](https://ps4linux.com/host-own-ps4-jailbreak-exploit-host-website/). For the first time I hosted it locally but later on I ended up using [this host](https://www.kmeps4.site/) which includes wide range of useful tools. When setting up the internet connection, make sure to use the custom DNS which not just blocks updates but also redirects the User Guide homepage to an exploit host.
We are going to be using an exploit discovered when comparing a difference between 9.00 and 9.03 patch. It's a filesystem bug, [OOB](https://cwe.mitre.org/data/definitions/787.html), and we can trigger the vulnerability by plugging in a specially formatted USB device at just the right time. The whole [exploit is in this repository](https://github.com/ChendoChap/pOOBs4) and the only thing you need to do is download the `exfathax.img` file and flash it on a USB drive. Any flasher for system images will do, e.g. Balena Etcher. Note that this will format USB, it's only a few MBs and you need this every time you are jailbreaking the system, after each restart. It's better to find some small old flash drive and just dedicate it to being the PS hack stick. In practice it's quick, you can cache the exploit host site you visit so you just open the browser after the restart and plug in the USB.
With the USB ready, open exploit host site in your browser, wait for it to load (ignore memory allocation errors if any) and choose the jailbreak for your system version. After clicking and loading, it should prompt you to insert a USB drive. Insert and wait a few seconds until PS notifies you it cannot read it and then click OK on the site prompt. And it's done! Or at least should be, there are tons of guides for this I am summarizing here, just check out the resources below if not sure.
Now that we successfully activated the exploit, your PS4 has gained superpowers! You can explore the many options it offers, load toolsets like [GoldHEN](https://github.com/GoldHEN/GoldHEN), alternative stores like [Homebrew](https://github.com/LightningMods/PS4-Store/) or linux payloads.
One thing you can do now is freely install any packages directly on PS4. This includes useful tools and all games you can torrent. For smooth installing process, you can do it over a local network. Get a [remote package sender](https://github.com/iref-use/ps4-remote-pkg-sender) on your laptop and install package installer pkg via USB in Goldhen menu. With this setup, you can trigger installation remotely from your laptop and packages are installing while you are using the PS4. However, the linux payload needs to be done differently.
When the console restarts, the exploit needs to be triggered again by visiting the website and plugging the usb drive. It takes just a minute and you can always put the console to rest but when running Linux, it might need restarts. It's possible to automatize the exploit on boot with an [Rpi or esp32](https://github.com/aladie/PS4RaspberryPi) instead of manually plugging the USB each time.
### Linux on PS4
Finally we are ready to run a GNU/Linux distro. This turns your PS4 to a personal computer instead of a locked single purpose device.
You need another correctly formatted USB stick. We are going to be switching the system to linux kernel so it needs to run from the USB stick and we can install it either on an external or internal drive. There are different installation methods and a bunch of different distros. [Here is an overview](https://ps4linux.com/run-ps4-linux-without-installing/) of following method.
I tried installation methods using the rescue shell and then disk image. The rescue shell proved to be successful but also gave me some problems at first. It basically forces the machine to load the kernel you pass via USB and then rescue shell boots the distro you provide on the same drive.
You can find many resources for different setups. Basically you need to create a FAT32 partition on your USB drive and place the kernel (bzImage) and initframs there. These depend on your machine and the distro you are going to be using. Checkout [this documentation](https://github.com/Hakkuraifu/PS4Linux-Documentation) and [PS4Linux download section](https://ps4linux.com/downloads/) for everything.
Instead of running linux on the usb stick, you can also install it directly on the internal drive. This is ideal if we want to run a node and utilize the SSD we got in a first place. The only thing you need to know about your machine is what [southbridge](https://www.psdevwiki.com/ps4/Southbridge#Southbridge_revisions) it uses.
Different hardware revisions come with different southbridges, this is a hardware version of SoC. There are 3 versions and for 2 of them, it's possible to install GNU/Linux directly on the internal drive. You can find out which version your machine has by chasis number or more easily in System information when loaded GoldHEN >=2.3. If you are unlucky and your console has Baikal, the unsupported bridge, you will have to use an external drive. This limits speed and usability but still works well.
Get your flash drive ready with the correct kernel and distro but before you run it, make sure to turn off some video options. In Settings, turn off HDR, deep colors and make sure the resolution is 1080p. Otherwise, you might just lose the HDMI signal upon booting the Linux kernel. Also prepare a keyboard and mouse.
With everything ready, use your favorite exploit host to load a linux payload. Use the one with 1 GB of VRAM because the installation doesn't use any VRAM anyway. Linux on PS4 is often use to run emulators or Steam games so there are options that utilize almost all RAM for video, but if you are running a node or using it as a PC without many games/media, just stick with the 1GB option and use more RAM.
After it loads, you will get a black blank screen for a few seconds and if nothing happens after a while, you have to manually restart the PS4 and try again. Maybe you need a different bzimage file or some settings are wrong but keep trying. Once you get a rescue shell, you should be able to trigger the distro installation. Again, there are many guides to this and the whole community, check out the resources below.
When your distro finally boots up, it's basically like any other linux PC. Plugin keyboard and mouse, you might need a USB hub if you are using the external drive for linux drive. There might be some issues you need to resolve like system updates and wifi/lan connection. The system I have been using is PSarch and in my case, I had to change pacman repositories and update keyring. Here is a guide that helped me but it's also a little outdated.
### Eth node
I like to utilize old hardware, mostly laptops, for running nodes and even though the PS4 wouldn't be considered e-waste just yet, it's perfect for a node server. Not just the performance, but owning this machine means it's sitting on a desk most of the year while you are not playing anyway. Why not run a node meanwhile?!
If you got all the way here, I am sure you know what to do. Your machine runs GNU/Linux and like any other computer, you can just download clients and run it. Make sure to use portable versions or compile them. (LH and Erigon didn't run first due to an invalid instruction). Since we are [Merged](https://bordel.wtf), you need to run a client pair, consensus and execution layer clients.
> Running a node, especially a mainnet Ethereum validator on outdated and improperly purposed hardware such as a PS4 is not a practical endeavor. While it may be a fun experiment, it is not a advisable choice for home staking.
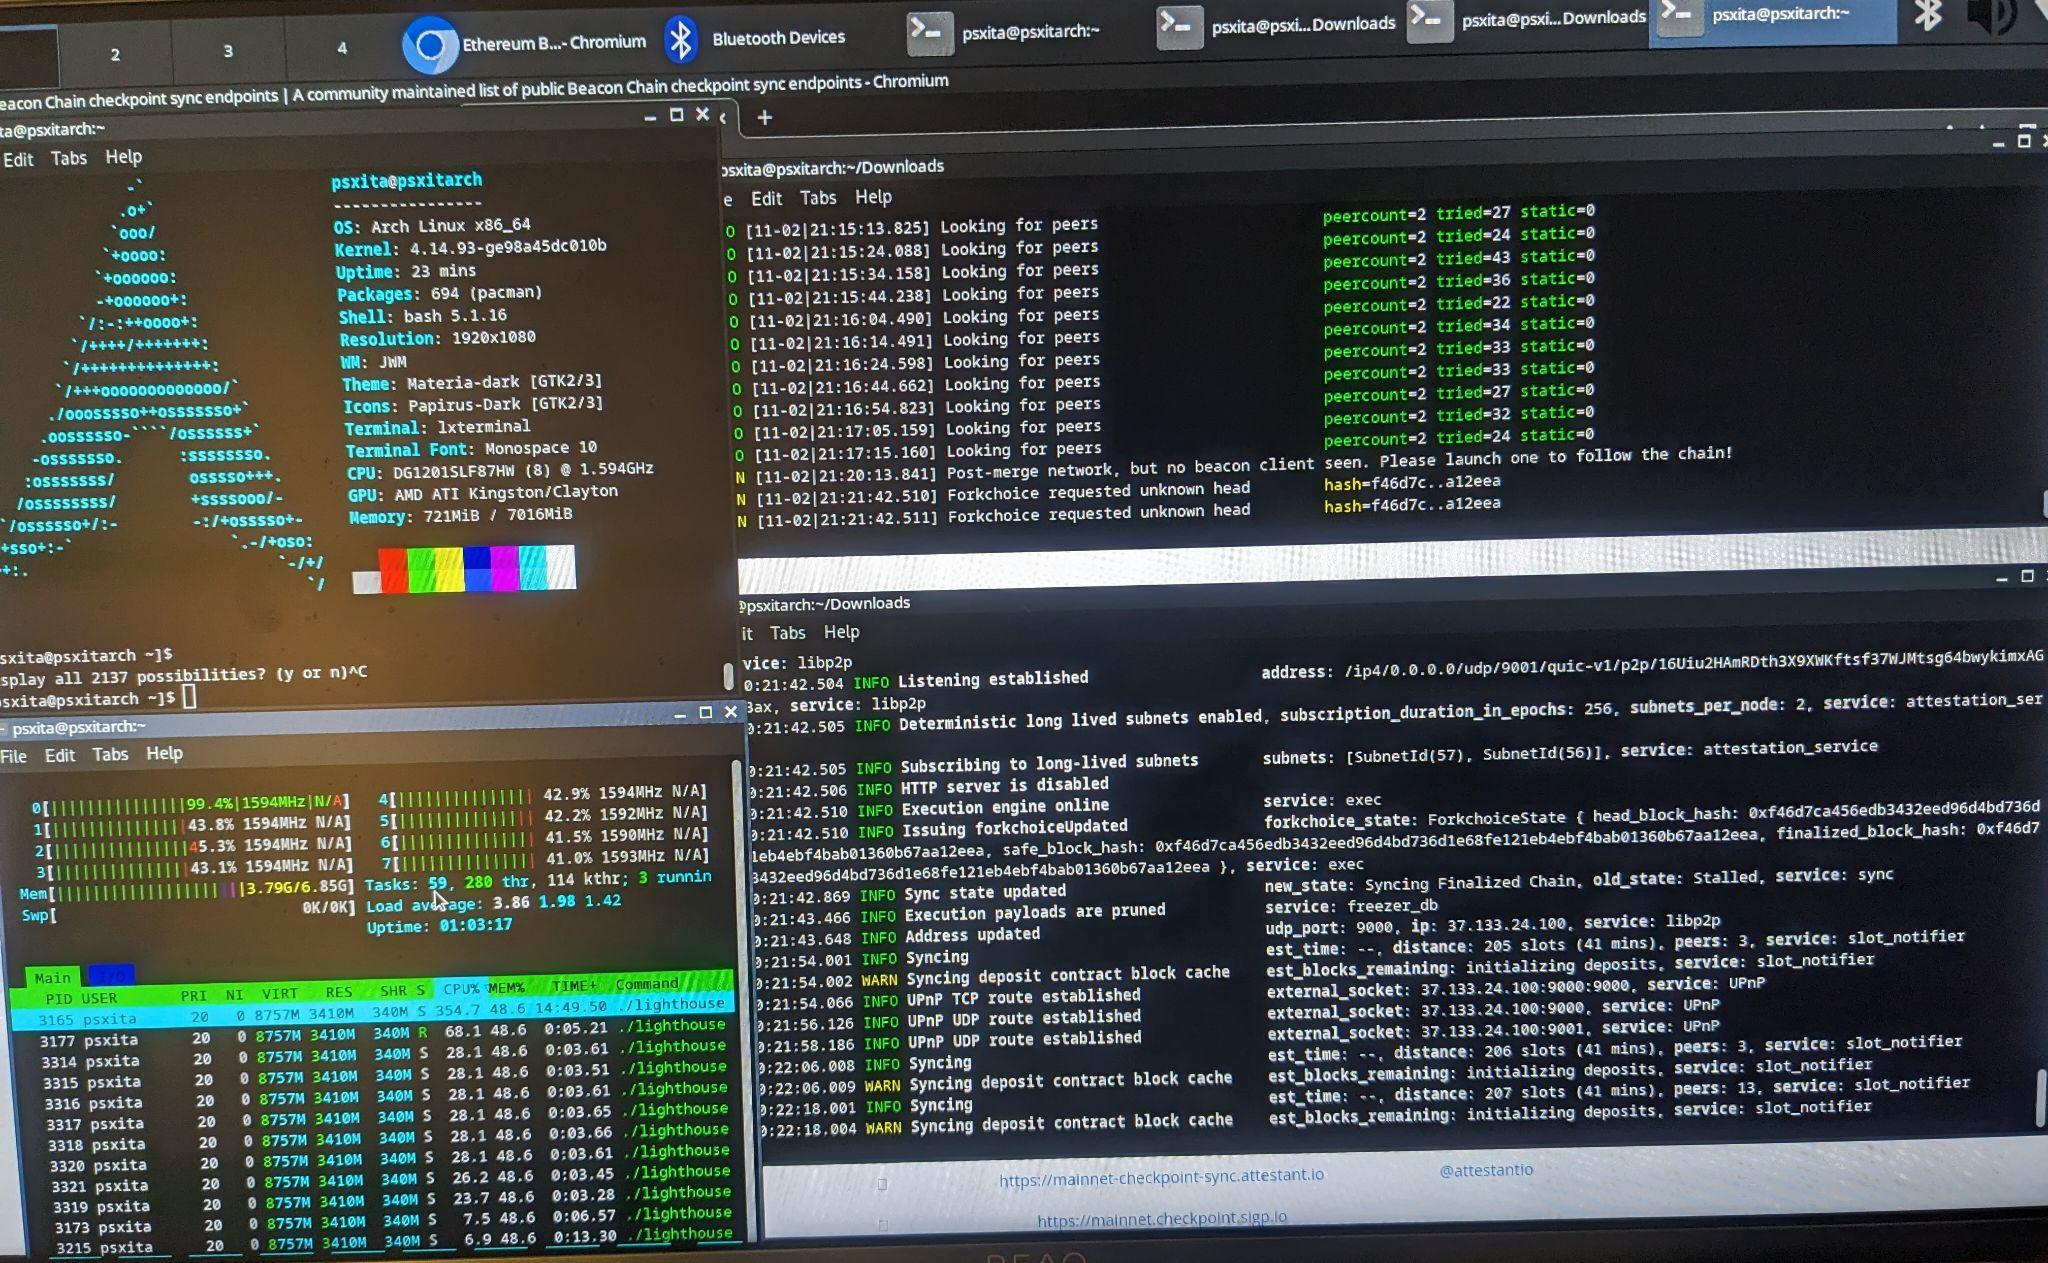
First I tried syncing Holešky which worked but after few minutes the system rebooted, probably due to running out of memory. Then I set lower cache options than the default, closed all other applications and it runs well since then. Also I would recommend a client that consumes less resources like Nimbus and also maybe switch to more minimalistic repo without GUI (there is Puppy linux but so far this arch doesn't consume much). Speaking about execution speed, I was getting around 10-25MGas/s on the mainnet. I will be doing some client and distro hopping to share more experience. You can use apps for monitoring temperature and controlling fans to make sure the machine runs smoothly.
I setup SSH access over local network, it works normally so I can just connect to my PS4 node from my laptop like with any other server. It just sits on a table and quitely syncs Ethereum.
## Resources
https://ps4linux.com
https://www.psx-place.com
https://wololo.net
https://twitter.com/Ps5_hacking
[Installing on internal drive tutorial](https://www.youtube.com/watch?v=OO4gkSze_dM)
https://ethereum.org/en/developers/docs/nodes-and-clients/run-a-node/
https://mirror.xyz/0x934e6B4D7eee305F8C9C42b46D6EEA09CcFd5EDc/b69LBy8p5UhcGJqUAmT22dpvdkU-Pulg2inrhoS9Mbc